The Steering Box .......................
Here is an Email message I posted on the Bus Boards on two different Yahoo groups on February 18, 2005.
This represents my feelings about the installation and results of the steering box upgrade.
The groups included the MCI-BUS-NUTS and MCI5'ERS
Hello All,
I have been struggling with the changing of my worn out steering
box for 16 months. What to do? Spend 2 grand and hope it works or dub
around? I called MCI and tried to discuss the problem with them and all
they were willing to offer was another mechanical box for $1300 with
exchange. They were willing to say that the steering even with a new
re-manufactured box would never drive like my Explorer. I read all of the
posts on the groups (I mean ALL of them) about various ideas and scenarios
available. I decided to speak with Sam Caylor at Caylor Supply in Rantoul,
Kansas about 4 weeks ago (1-785-878-3405). After a conversation with him
about he having done quite a few of these changeovers from the “old”
mechanical steering box with hydraulic assist using a hydraulic cylinder to
the newer integral steering box from a newer model coach, I decided to take
the chance. I purchased the steering box and upgrade kit which included the
new mounting plate, a brace, some angle plates to solidify the installation
of the mounting plate, some new hydraulic male adapters, the necessary bolts
and a few photocopies sketches plus shipping for about $2000. I did the
installation myself. Needed tools included a cutting torch, stick welder,
another 3 feet of 1” square tubing (for more bracing), some large sockets
and wrenches and several drop cords with lights, and an occasional extra set
of hands. The job took me 8 hours for removal, 4 hours of cutting and
grinding and measuring, 8 more hours of welding and building some staging to
support this 100 pound steering box and installing of the new mounting plate
and steering box, 1 hour to refill the power steering fluids, 1 hour to
repair a burnt air line (when I dropped the torch) and 1 hour of looking
over everything I had done to be sure I re-installed all necessary locking
bolts, and cotter pins, and 3 phone calls to Sam. I am sure that the next
time I can cut the time by 1/3 knowing what I know now.
Was it worth it? Well that is the question isn’t it? YES YES YES YES! Of
course, I would have liked to pay ˝ as much but the price is the price.
Changing out this box makes the bus drive just like my Explorer. Steady,
straight and easy! I am already less tired. When I purchased the bus, I
had 12 inches of play in the wheel. I lost 6 inches of play when I replaced
the universal joint in the steering column, I lost another 3 inches when I
tightened up the OLD steering box using the big nut on the side of that box
and still I had 3 inches of slop going down the road at 65 MPH was
exhausting to say the least. I had to continuously steer those 3 inches
just to keep the bus traveling straight. NO MORE. It was well worth the
effort and the money. According to Sam, this newer box comes from a newer
bus that he purchased as salvage. OK with me. Although he did not tell me
how old the bus was, I can tell you that the box, the bolts, the pitman arm
all appeared to be about 3 to 4 years old. I would recommend this changeover
to those of you who have Ithe old mechanical, hydraulic assisted box assuming
that your box is worn out.
End of post.
Installation precautions and instructions.
I did not take any pictures. Sorry. With such a small area to work in, a torch in one hand and a drop light in the other, it was difficult enough to do the work. However, having said that...
It would be worth having the areas around the steering box and the respective compartments involved "degreased" with a high pressure hot water cleaner.
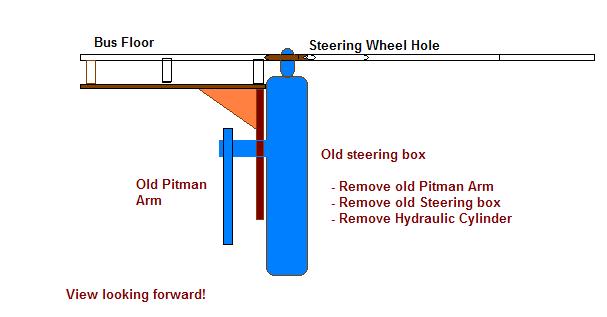
My bus has a rather clean tire compartment with the bottom removed. I cleaned out the tool box compartment under the driver's area. Start by making sure that your wheels are as straight as possible before removing anything. I started by removing the steering wheel and shaft. I removed the hydraulic lines and had a few plastic pans ready to capture the fluid. Next I removed the hydraulic ram. FYI, I had to cut (cutting torch) almost everything except for the 3 bolts that held the old steering box. Next came the pitman arm. Next the steering box came out.
Now it was time for removing the old steel plate mount that held the old steering box. I first reached up and removed all of the plastic bagged insulation in the area and trashed it. Some of it was squeezed into the steel cavities, so you have to look for it. I removed all that I could see so that the burning of plastic and fiberglass would not drive me out of the area. I would suggest that you have a small fire extinguisher handy. Blowing hard on the small fires put most of them out quickly except for the rubber bushings which took a few extra puffs. I also removed the old "drip pan".
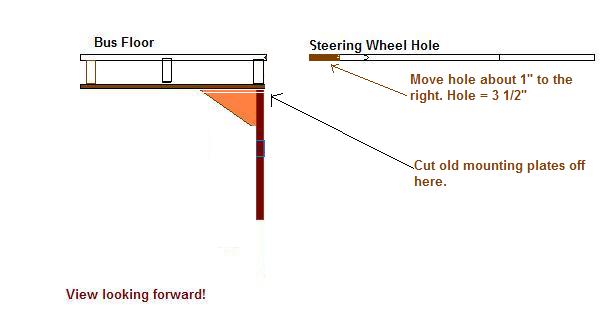
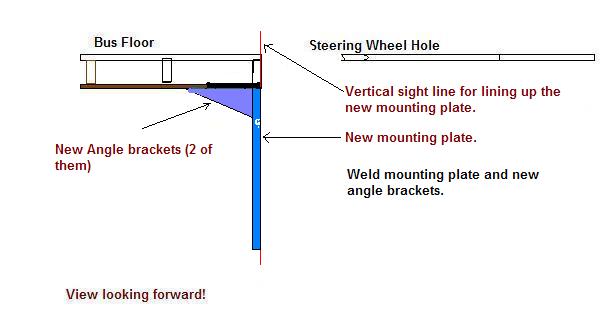
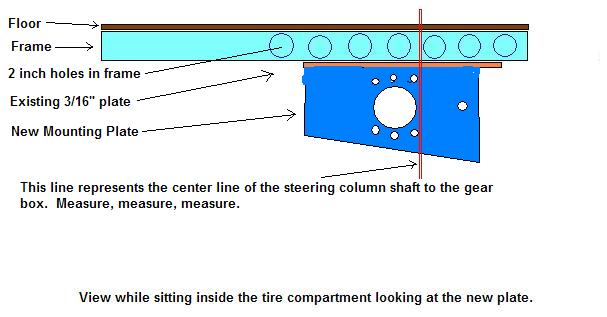
Once you remove the bulk of the steel mounting plate, you will have a better picture of what needs to happen. The new steel plate will be welded into place in the same place as the old one but lined up to specific measurements supplied by the instruction sheet. Essentially, the box installs almost straight up with the steering shaft facing up into the hole where the steering shaft will attach. I had to open the plywood floor a bit. Take a few measurements to the center of the steering shaft and adjust the floor hole. I used a 3 1/2 inch hole saw to move the hole approx 1 inch toward the center of the bus. Back to the new plate.
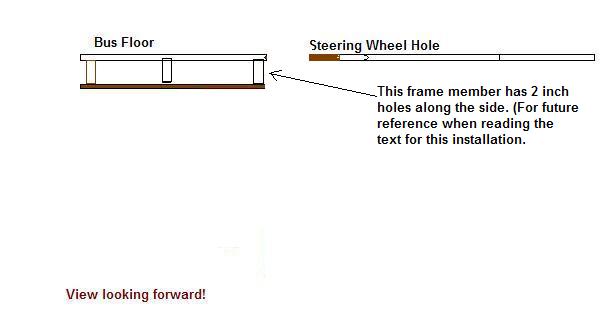
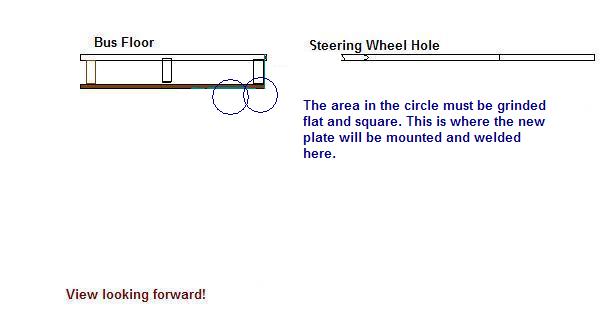
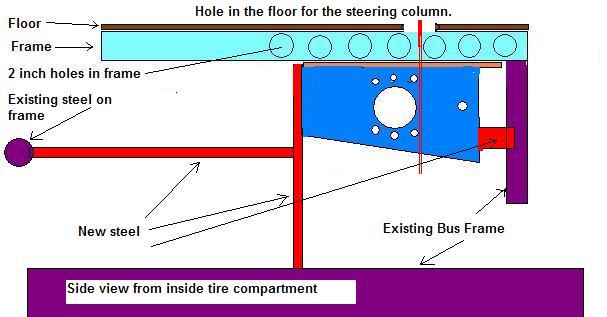
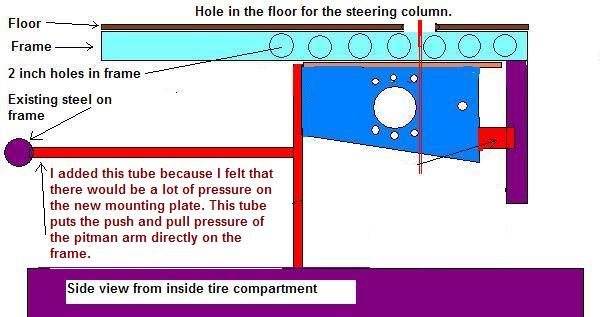
The surface area where the plate will mount must be ground flat and square so that the mounting plate will sit flush for welding purposes. The plate will mount flush in the vertical plane with the frame member that has 2 inch holes in it (part of the bus). This is important since the gear box will mount to the mounting plate and pass the plates edge. There has to be place for the gear box to mount without hitting the upper frame member. The new gear box appears to be a much more "beefy" one as compared to the old one. So I felt that I should install an additional steel tube (weld) from the base mount of the old hydraulic cylinder to the new mounting plate. This solidly attaches the frame of the bus to the new mounting plate where the steering box pushes and pulls when the box is actually "steering". I will post sketches on my web site in the near future.
The steering box is quite heavy (maybe 100 pounds) and some block staging and extra hands must be in place to install the box. Once bolted in, the pitman arm goes in. The face of the splined shaft has a faint line on it which ultimately must be parallel with the bolt that holds the pitman arm in place. The new tie rod must be screwed in so that when the pitman arm is hooked up, the pitman arm is near vertical.
When re-assembling my steering shaft, I found that I had to use my original shaft since the one supplied was approx 1 1/2 inch too short for my bus. No big deal.
On my bus the pressure side of the power steering pump comes to the front in the pipe (of two next to each other) nearest the passenger side. Facing the front of the bus (and steering box) this pressure hose connects to the connector nearest the driver side of the bus. The pressure side can be determined by looking into the rear passenger side compartment and following the hose from the pump to the wall where a can type filter is attached to the wall and then following the hose up to the area where all pipe go forward to the front of the bus. If you look closely you will see a letter "P" stamped into the housing near this hose port connection. If you install it wrong, you will not be able to turn the steering wheel when you start the bus. Shut down the bus and change the two hoses. The new connectors (supplied) have rubber o-rings that allow for the connection to the gear box with the existing hoses.
Centering of the steering wheel is probably the last operation. Be sure to put in all lock washers, cotter pins, and maybe some thread lock goop to insure that nothing comes loose. Then check again.
End of instruction set.
|
|
|
|
|
|
|
|